Palo Alto Networks - Using a dynamic public IP address
I use a Palo Alto Networks VM-100 at home as my primary firewall. I previously used a Juniper SSG5, but the VM-100 has more horsepower and way more options. I’m using a my home ESXi server (a whitebox) to run the VM-100, and it’s very fast. The only issue I run into is that I am on a residential internet connection, so I have a dynamic public IP address that my ISP can change at any time.
In order to configure inbound NAT policies when you have a dynamic public IP address, you’ll have to use some tricks with dynamic DNS and address objects to make it work. I wish there was a cleaner way to do this, but I haven’t found anything. The new version of PANOS has some features where it can poll an XML server for IP addresses to add to an address object, but the Palo Alto’s XML export API doesn’t match the required XML syntax.
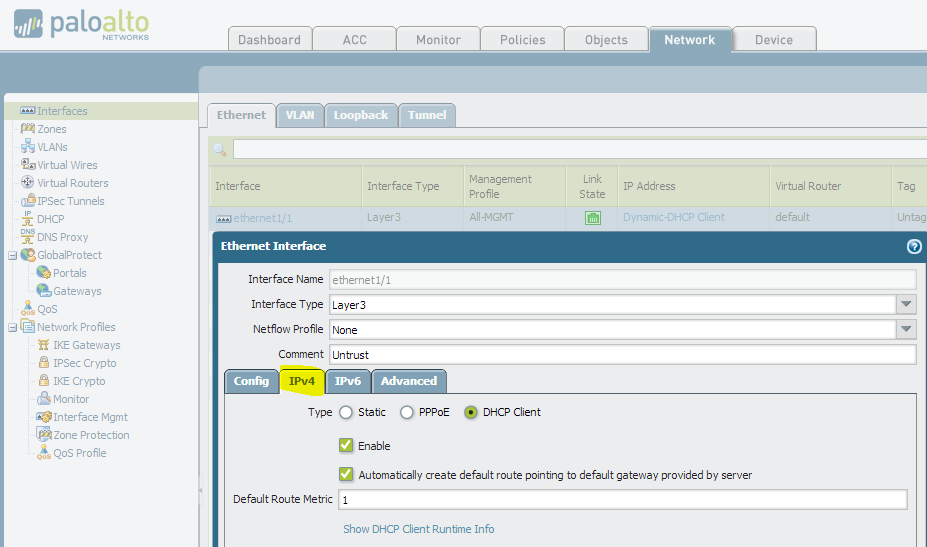
Configure your public interface
Your first step will be to use the Interfaces section under the Network tab to configure your public interface. It will probably be in the Untrust Layer 3 zone. In the interface properties, you want to go to the IPv4 tab, and then set the Type to DHCP Client and ensure that both boxes are checked. The interface will now automatically get a public IP address from your ISP, and will create the proper route in your routing table.
Install & configure dynamic DNS updater
Dyn has a service called DynDNS, where their software will automatically probe your public IP address, and will then update a public DNS record with your new IP address. The Juniper SSG5 used to be able to do this on its own, as it had a DynDNS agent built-in. The Palo Alto Networks firewalls don’t have this feature, so you’ll have to install the software from Dyn onto any of your home PCs or servers to facilitate this. DynDNS Pro is the cheapest service, which is $20/year for users. I had an account with Dyn before they started charging, so my account has been grandfathered in for free. If you’re just getting started with them, you’ll unfortunately have to pay the yearly fee. There are alternative options, like No-IP, which still offer free dynamic DNS services. Any dynamic DNS service will do, but I would recommend sticking with Dyn if you already have a free account with them, or trying out No-IP if you want a free solution.
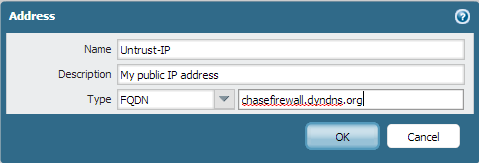
Depending on which dynamic DNS service you use, you’ll get a custom domain name that will match your public IP address. For example, I could use “chasefirewall.dyndns.org” as my dynamic domain name that maps to my home IP address. Once you have picked a service and configured their updater software, write down the dynamic domain name that you picked (or were assigned) and move on to the next step.
Create a FQDN address object
Navigate to the Addresses section under the Objects tab to create a new FQDN address object. You want to create an object that will be a stand-in for your public IP address, and we’ll tell the object to use a DNS lookup to your dynamic domain name to grab the right address.
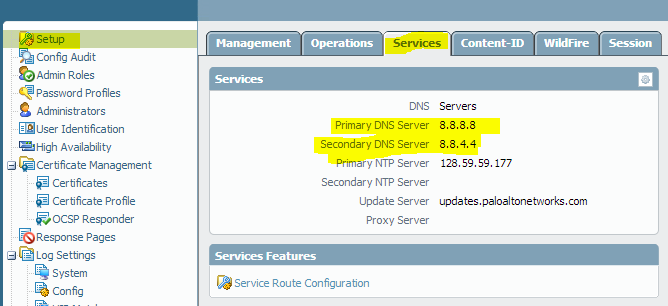
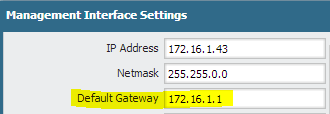
Now, in order for this to work properly, your Palo Alto Networks firewall needs to be able to do DNS lookups to resolve your dynamic domain name to the proper IP address. Make sure you’ve configured your firewall’s management interface with DNS servers and a default gateway.
Note that you can (and probably should in 99% of cases) use your Trust interface for your default gateway, which will send your management interface’s traffic through your firewall and NAT policies to the internet.
The firewall will refresh the object regularly, so the object should stay relatively accurate. Even though your address may be dynamic from your ISP, the IP itself tends not to change that often.
Create your NAT and security policies
When creating your policies, you always reference the object that we created as the Destination Address in both the NAT and security policies.
NAT Policy:

Security Policy:
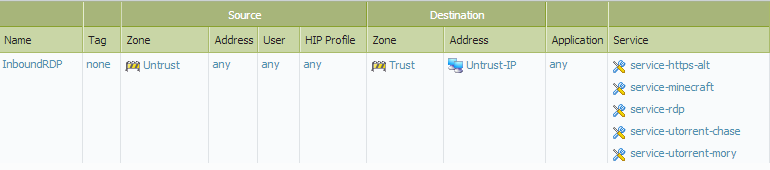
As you can see, I use my new Untrust-IP object in both policies. Because we used an FQDN Address object type, the IP address will be regularly updated and our traffic will always be allowed in.
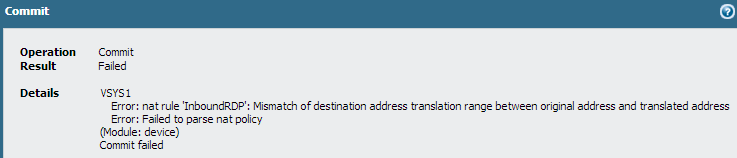
If you try to cheat by setting the Destination Address in your NAT policy to “Any”, you’ll get a commit error.
Hopefully you find this guide useful and you’re able to set up some inbound NAT/security policies for your Palo Alto Networks firewall even though you don’t have a static IP address from your ISP.